Step 5: Using buttons to get input
Now you’re able to control an output component (an LED), let’s connect and control an input component: a button.
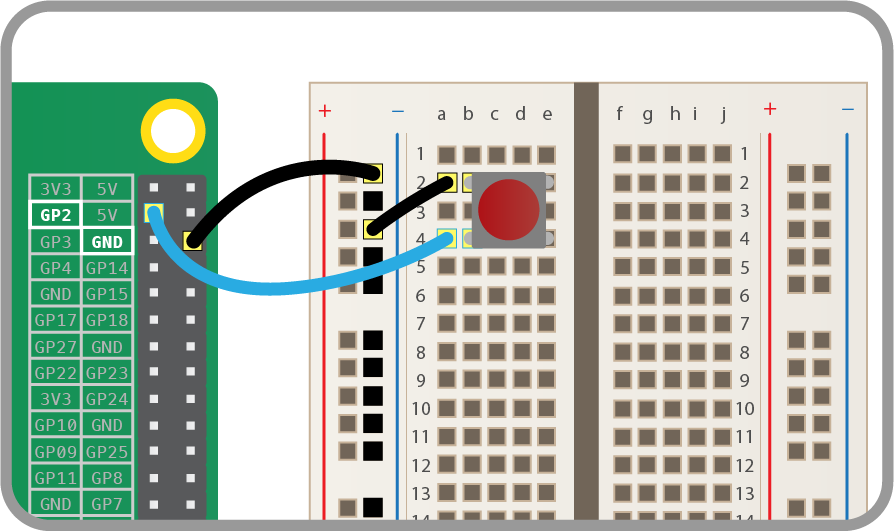
- Connect a button to another GND pin and GPIO pin 2, like this:
- Create a new file by clicking File > New file.
- Save the new file by clicking File > Save. Save the file as
gpio_button.py. - This time you’ll need the
Buttonclass, and to tell it that the button is on pin 2. Write the following code in your new file:12from gpiozero import Buttonbutton = Button(2) - Now you can get your program to do something when the button is pushed. Add these lines:
12button.wait_for_press()print('You pushed me')
- Save with Ctrl + S and run the code with F5.
- Press the button and your text will appear.
Physical computing is one of the most engaging classroom activities, and it’s at the heart of most projects we see in the community. From flashing lights to IoT smart homes, the Pi’s GPIO pins make programming objects in the real world accessible to everybody.
Some three years ago, Ben Croston created a Python library called RPi.GPIO, which he used as part of his beer brewing process. This allowed people to control GPIO pins from their Python programs, and became a hit both in education and in personal projects. We use it in many of our free learning resources.
However, recently I’ve been thinking of ways to make this code seem more accessible. I created some simple and obvious interfaces for a few of the components I had lying around on my desk – namely the brilliant CamJam EduKits. I added interfaces for LED, Button and Buzzer, and started to look at some more interesting components – sensors, motors and even a few simple add-on boards. I got some great help from Dave Jones, author of the excellent picamera library, who added some really clever aspects to the library. I decided to call it GPIO Zero as it shares the same philosophy as PyGame Zero, which requires minimal boilerplate code to get started.
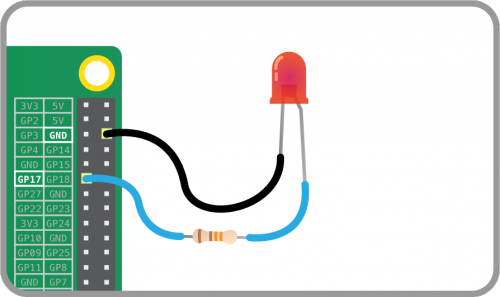
This is how you flash an LED using GPIO Zero:
|
1 2 3 4 5 6 7 8 9 10 |
from gpiozero import LED from time import sleep led = LED(17) while True: led.on() sleep(1) led.off() sleep(1) |
(Also see the built-in blink method)
As well as controlling individual components in obvious ways, you can also connect multiple components together.
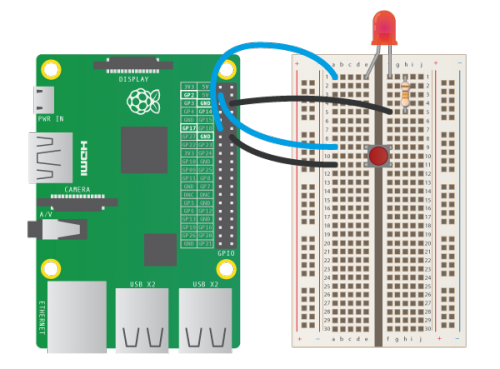
Here’s an example of controlling an LED with a push button:
|
1 2 3 4 5 6 7 8 9 |
from gpiozero import LED, Button from signal import pause led = LED(17) button = Button(2) button.when_pressed = led.on button.when_released = led.off pause() |
We’ve thought really hard to try to get the naming right, and hope people old and young will find the library intuitive once shown a few simple examples. The API has been designed with education in mind and I’ve been demoing it to teachers to get feedback and they love it! Another thing is the idea of minimal configuration – so to use a button you don’t have to think about pull-ups and pull-downs – all you need is the pin number it’s connected to. Of course you can specify this – but the default assumes the common pull-up circuit. For example:
|
1 2 3 |
button_1 = Button(4) # connected to GPIO pin 4, pull-up button_2 = Button(5, pull_up=False) # connected to GPIO pin 5, pull-down |
Normally, if you want to detect the button being pressed you have to think about the edge falling if it’s pulled up, or rising if it’s pulled down. With GPIO Zero, the edge is configured when you create the Button object, so things like when_pressed, when_released, wait_for_press, wait_for_release just work as expected. While understanding edges is important in electronics, I don’t think it should be essential for anyone who wants to create a simple interactive project.
Here’s a list of devices which currently supported:
- LED (also PWM LED allowing change of brightness)
- RGB LED
- Buzzer
- Motor
- Button
- Motion Sensor
- Light Sensor
- Analogue-to-Digital converters MCP3004 and MCP3008
- Robot
Also collections of components like LEDBoard (for any collection of LEDs), FishDish, Traffic HAT, generic traffic lights – and there are plenty more to come.
There’s a great feature Dave added which allows the value of output devices (like LEDs and motors) to be set to whatever the current value of an input device is, automatically, without having to poll in a loop. The following example allows the RGB values of an LED to be determined by three potentiometers for colour mixing:
|
1 2 3 4 5 6 7 8 9 10 11 12 13 |
from gpiozero import RGBLED, MCP3008 from signal import pause led = RGBLED(red=2, green=3, blue=4) red_pot = MCP3008(channel=0) green_pot = MCP3008(channel=1) blue_pot = MCP3008(channel=2) led.red.source = red_pot.values led.green.source = green_pot.values led.blue.source = blue_pot.values pause() |
Other wacky ways to set the brightness of an LED: from a Google spreadsheet – or according to the number of instances of the word “pies” on the BBC News homepage!
Alex Eames gave it a test drive and made a video of a security light project using a relay – coded in just 16 lines of code.
